

Engine knock otherwise known as detonation can happen due to many possible reasons, from age of components, fuel injector or filter problems, to ignition spark or timing advance. Usually these sounds sound like faint rattling or ‘marbles in a tin can’ but can lead to serious engine issues, including premature engine failure.
The chances of experiencing knock during normal operation only ratchets up when you are talking about a turbocharged vehicle.
Good news is we’ve got you covered with our How to Build a Knock LED guide. Implementing this LED will allow you to see the knock and let you step off the gas.

Q : How can I tell if my engine has knock?
A : It’s a fairly common question that users pose to us, and chances are if you are asking this question you have listened to your motor for an extended period of time. The word knock may confuse people, but the sound is more of a ping or metal clinking against metal.
Today we’ll be walking you through the installation of a ‘knock sensor’ LED, or a visual sign that your ECU / PCM is experiencing detonation. The purpose of this writeup is two fold, one is to show you how to wire a LED inline for your PCM as long as it has a knock sensor wire, and the other is to show you how to wire this LED into a second generation DSM.
If your vehicle is equipped with a Knock Sensor output, you can easily install a LED inline to help show you when your ECU or PCM sees knock and beings to pull ignition to try and salvage your engine.
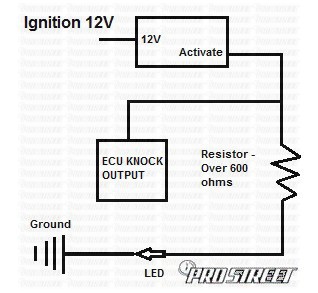
By following the diagram above, you can simply tee into the knock sensor wire of your PCM or ECU and wire this directly inline to an individual LED. Mount this LED someplace at eye level on your dash or someplace where you can easily notice it when illuminated.

But there’s quite a few vehicles that come turbocharged from the factory without such a knock sensor output, or any way of wiring in this knock LED. One such vehicle is the second generation Mitsubishi Eclipse Turbo, with the 4G63 engine platform one of the most powerful sport compact engines of the mid 90s.
Because there is no true knock output wire, we’re going to be improvising by teeing into the factory turbo wastegate solenoid. During normal operation the ECU / PCM utilizes the boost solenoid to actuate the turbo wastegate and regulate boost.

One of the most common ‘free mods’ for this vehicle is to remove the plastic restrictor, giving you 1-2 lbs of additional boost. For more information on how to manipulate, install or replace your boost controller or boost solenoid check out our How-To on Boost Controllers.
Q :What does the boost solenoid have to do with knock?
A : As the Second Generation DSM does not come equipped with a knock output, we’ll be thinking outside of the box and wiring a Knock LED into the car by way of the boost solenoid.
As we stated earlier, the ECU / PCM will keep the boost solenoid open during normal operation. However when the ECU sees knock, it will attempt to pull back on the boost solenoid and this is the action we’ll be using to signify knock.

To find the boost solenoid wire, refer to our DSM ECU pinout page located here http://my.prostreetonline.com/2013/09/05/faq-1g-and-2g-dsm-ecu-pinouts/
The block on our second generation Eclipse ECU that you’ll want to locate is the 26 pin. The ECU and ECU harness is found behind your stereo in your vehicle, please refer to our Apexi Super AFC page for the how to access your ECU.

Undo the screws that hold in your driver side center console cover, and you’ll see the ECU harness and the 26 pin plug (B53 if you own a Helms manual ) you’ll need for reference.

The factory Boost Control Solenoid is ground activated, and is plugged in using a 2 pin weatherproof connector. The way this unit is turned on is the ECU sends a ground to the solenoid, which will allow the boost controller to flow as much as possible.
When knock is heard by the knock sensor and sent to the ECU, the ECU will attempt to pull boost first by sending a 12v signal to the boost solenoid.
What we’ll be doing is teeing our LED into one side of the trigger wire for the factory boost solenoid, Pin 11 on the 26 pin block of our 2g ECU. The BCS signal wire is a yellow-red wire and it should be the 11th pin from the left in the top row when looking into the 26-pin ECU connector (two rows of 13 pins each).
Again for the ECU pinout, click here.
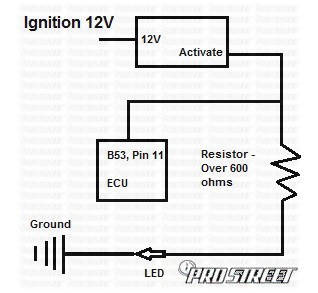
Wired in this manner the knock LED lights up when the ECU is closing the BCS (BCS signal is 12V), and the knock LED should stay off under normal conditions when the BCS signal is 0V.
Parts you will need to complete this job.
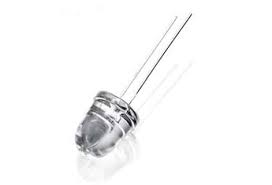
1. A two pin LED – you can purchase these guys almost anywhere but Radio Shack is a good bet.
2. Any 600-ohm or higher resistor – This resistor is vital if you want to retain the usage of your factory boost solenoid. If you don’t have this, chances are your boost solenoid will never close.

First solder the resistor inline of your LED, and test the LED by connecting 12v power to the other end of the resistor and the chassis ground to your unconnected LED end. If you did not wire it correctly, not to worry as you will not cause damage to the LED if you connect them backwards.
If your LED does not light up, take the resistor off and connect it to the other end of the LED, and then test again. Once you have the LED tested correctly, you solder the end of the LED that does not have the resistor on it ( the cathode ) and connect that to a chassis ground.
Connect the anode side ( resistor side ) to your boost control solenoid wire, and you are done! You have now successfully installed a Knock LED light for your second generation Eclipse or DSM.
Happy Tuning!


 🔥")


