

Now that you’ve received your 1JZ/2JZ powerplant from your favorite wrecking yard or Japanese Domestic Market (JDM) Engine Importer, you are going to want to take the time to go through your motor before it’s swapped into the vehicle of your choice. This step becomes even more urgent when you factor the time most of these imported motors are abused in their native country, and can sit in wet conditions for long periods of time before purchased.

After all, you don’t want to go through the trouble of removing your stock engine and swapping in an engine that may have problems with it do you? One of the man reasons you want to learn how to rebuild your 2JZGTE, here is part one of our comprehesive guide. Tools you will need:
- 14mm socket
- 12mm socket
- 10mm socket
- 10mm bi-hex for head studs or 10mm six point deep socket
- ARP Head Studs part number –203-4205– Optional
- Cometic Head Gasket –7771890- or head gasket of your choice – optional
Engine Disassembly To begin get your 2JZGTE motor on a working engine stand so that you can access all areas of the engine completely and easily. Drain fluids if any from your motor and asses what you are missing if anything, if you have a complete engine and motor you can begin by removing your exhaust manifolds and intake manifolds to begin.
Removal of the manifolds and ignition components

Begin by disconnecting the injectors by undoing the injector clips and the related connectors. After disconnecting the stock fuel rail, simply pull the harness forward and away as you will have to remove the spark plug cover next.

Although it’s difficult to mix up these injector sequence, you can always line up the injector clips in sequence by color. The No.1, No.3 and No.5 injector connectors are dark gray while the No.2, No. 4 and No. 6 injectors are light gray. Disconnect the 2JZGTE camshaft position sensor and the three engine wire clamps from the injector holders.

Now you can move onto removal of the spark plug cover and the ignition components down the middle of your 2JZGTE. Take your 5mm allen and remove the spark plug plastic cover, set the 10 allen head bolts to the side with your plastic cover.
Remove the 2 hoses that interconnect the valve covers to each other, take care when removing these hoses as some may be fragile or prone to cracking. If your hard vacuum lines look like they are susceptible to crack or seem brittle, try to skip this part and move onto the coil removal.

Take your needle nose pliers or a small flathead screwdriver and depress the clips that connect the wiring loom to your ignition coils. Open all the connectors and pull the harness out of the way by pulling the wiring connectors from ignition coils and spark plugs. Now with your fuel injector harness, pull the entire wiring harness along with the ignition harness out of the way and set it to the side.
*Take care not to damage the ignition coil connectors, as damage can occur in this area and will require you to either repair or put a spade on either wire.
Remove the 3 coilpacks by undoing the 10mm bolts that hold them in place, there are two bolts for each coil pack pair, so there are six bolts in total to remove. With these guide 10mm bolts removed now you can pull gently on the coilpacks and pull them out from the engine.
Sometimes the spark plug may be stuck inside the coil pack, in this case make sure to pull straight up and remove from the spark plug and motor. The 2JZGTE ignition coil packs are not intelligent ones, meaning you cannot mix them up but it’s nice to put the proper packs in their old location so that the 10mm bolts and brackets all line up.

WIth the coil packs removed now is a good time to survey your engine and remove any and all debris ( or attempt to at least ) that may be stuck in the spark plug valley of your 2JZGTE.
Remove your spark plugs with your spark plug removal tool and set these plugs to the side, now with the plugs removed and no compression in the motor you are ready to remove the exhaust manifolds and turbos and move onto more exciting stuff.

Now remove the inlet pipe that leads to your turbochargers by loosening the clamps (purple circle) and sliding the Y pipe off the charge piping. Disconnect the oil lines as well as the three water lines that lead to your turbocharger (pink circle) and slide the Mass Air Flow ( MAF) snorkel off, allowing you to move the unit.
You can also check your sensors while reading our How To Rebuild Your 2JZGTE article, a guide on testing the camshaft position sensor, crankshaft position sensor or MAF.
How to Check Your 2JZ Mass Air Flow Sensor
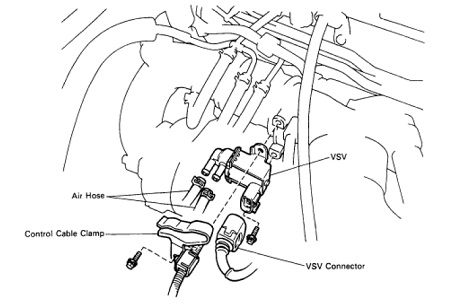
Disconnect the VSV connector and take off the vacuum leads to your actuator, and disconnect your 02 sensor that is located in the picture above. After disconnecting the 02 sensor from your 02 housing, you can now proceed to remove the 2 10mm bolts that hold the turbo heat shield in place.
2JZ Sensor Guide – What Sensors do I need to swap my 2JZGTE?
Remove all connectors to your alternator and your engine coolant sensor as well as the crank position sensor, which has the connector to the left of the engine.

Unplug the Engine Coolant Temperature sensor as well as the crank position sensor and you should be good to pull the entire harness up and out of the engine swap.

Once you have these connectors disconnected and removed as well as set to the side, now you can remove the intake tubes and the connecting hoses. Remove the two 10mm nuts that secure the inlet pipe to the turbocharger opening, and slide the pipe off.

Now move onto your Blow Off Valve (BOV) inlet and dump tubes as well as the valve itself, and remove the sublet pipe as shown.

Disconnect the inlet tubes and intake tubes, you now have access to the exhaust manifold nuts that hold the entire turbocharger and manifold assembly to the motor.

The diagram above shows you what pipes need to be removed and set to the side, now pull off the heatshield originally shown that was held on by two 10mm bolts. Slide the heat shield off and remove all the exhaust nuts on your turbo manifold, and slide the entire assembly off and away.
You should now be looking at a completely naked long block, unless you still have whichever accessories that came with your motor in place. If so take this time to remove your accessories like your A/C Compressor, your Power Steering Pump and your Water Pump.
*Water Pump Notes : If your motorset is a JDM one, you will need the front half of the water pump to be converted to a USDM version in order to accompany the correct serpentine belt. You can opt to block off the additional JDM water pump return if you choose to, but we recommend doing it right and getting a USDM water pump.

Removing the front of your 2JZ Engine
Next up we’ll be removing the front engine cover from your 2JZGTE in order to access the shortblock as well as the bolts that hold your timing belt tensioner, crank snout and crank position sensor in place.
Remove the 10mm bolts that secure the front engine cover in place, undo the crank pulley and use a gear puller to remove the crank pulley itself. 
There are 12mm bolts that hold the serpentine belt tensioner in place, make sure this is removed so that you can reinstall the timing cover safely.

Now you can opt to use the Toyota Variable pin wrench set part number 09960-10010 or just the wrench arm which is variable pin wrench part number 0992-01000 to hold the camshaft in place or cam gears in place while you gun the bolt off. With this cam bolt removed, you can slide off the cam gears and you should be looking at something like this.

Remove the 12mm bolts that secure the belt tensioner in place ( orange circles ) and then proceed to remove the 10mm bolts that hold the upper timing plate. Now you will be able to remove this upper plate and set it to the side, and can access the cylinder head.

Now with your upper timing cover removed, move onto the lower cover and undo the 10mm bolts that hold the lower guard in place. You should now have your front engine cover fully removed and ready to drop the oil pans and oil pumps, make sure to remove your crank position sensor at this time as well as the hydraulic tensioner.

Remove your crankshaft timing pulley by using the pulley gear tool from Toyota, or a simple 3 bolt style gear puller. Make sure not to bend or damage the fins on this pulley as it may disrupt the signal for your crank position sensor.
How To Service Your 2JZ Crank Sensor
Before we remove the oil pump you will need to remove the complete oil pans, both the lower and upper pans as well as the windage tray and oil tube pickup.

Take your motor and flip it upside down to allow you to remove the 10mm nuts and bolts that hold the lower oil pan to the upper pan.

Remove the oil tube pickup and then move onto removing the 12mm bolts that hold the aluminum pan to the shortblock. You should now have a clear look at the lower half of your 2JZGTE engine. Take this time now to check your bearings for any unusual heat spots or signs of rod knock.

If you do see any suspicious looking bearings, you are going to want to take a break from our How To Rebuild Your 2JZGTE guide. Have a good electronic torque wrench handy and plastigauge. If you are not comfortable servicing your rod or crank bearings, skip this step and take the shortblock to your local machine shop.

When removing your main caps or rod bearings, always take the utmost care as to not nick or damage the surfaces of your crank or your block. Again, if you are not comfortable with this step by all means SKIP IT. This section is not covered in our part one How To Rebuild Your 2JZGTE guide, but in chapter three.

You will have to remove the windage tray and the 10mm bolts that hold the tray in place. Keep these 10mm bolts and hardware in a separate bag.

Next move onto the front of your engine and remove the 12mm bolts that hold the oil pump and front plate to your block. If you haven’t already inspect your oil pump by checking out our How-To, or simply toss this unit in favor of a new Toyota Oil Pump, part number 15100-46052.

If you aren’t replacing your Toyota Oil pump, now is the time to replace the front main oil seal, part number 90311-46001, or otherwise known as a Crankshaft Seal.

If you need to check your Toyota Supra oil pump vanes or check your oil pump, check out our How To Check Your 2JZ Oil Pump.

Now take your motor and flip it back right side up and allow the excess oil to drain out, take a break at this time and let gravity take over. Make sure to have kitty litter and rags handy to clean up the mess before continuing onto your cylinder head removal.
Removing your Cylinder Head
Next we’ll be removing the 10mm bolts that secure the valve covers to your engine, if you opted to skip the PCV cross connecting hose removal earlier, you will need to take off both valve covers at the same time to prevent these hoses from becoming damaged.

Remove all the 10mm bolts and nuts that hold down the valve covers to your cylinder head and then gently lift the valve covers up and out. Check your valve cover gaskets at this time for any pinching or damage that may lead to leaky valve covers, the part number for this replacement is 11214-46011, Valve Cover Gasket Exhaust, and 11213-46020, Valve Cover Gasket Intake.

This is what you should be looking at and chances are if you opted for a JDM motorset, there may be some pitting and damage to your camshafts. Remove the cam caps on your cylinder head and set them IN ORDER on the side. Remember to keep the sequencing of these cam caps and keep them aligned and in order.

It looks as though our JDM motor may need some new cams, as this set is far too pitted for repair. If your budget allows we carry a full lineup of HKS, Kelford and Crower cams for the 2JZGTE engine set.
Now is the time to take your 10mm six point deep socket or bi-hex and remove the head studs installed on your engine from the factory. This is a great time to upgrade your head studs to a set from ARP or upgrade even further by installing a HKS, Cometic or Buddy Club 2JZ head gasket.

Now you should be ready to take off your cylinder head and get it sent out to your local machine shop for inspection. They should be checking the deck flatness for warpage.

This ensures that when you install the cylinder head back onto your new headgasket and shortblock the head is flat enough to create a seal. You don’t have much further to go in part one of the how to rebuild your 2JZGTE guide, but we are just getting warmed up.

Once your cylinder head is removed you can take a look at your shortblock and inspect it’s conditions. If there is a low amount of rust in the cooling jackets in your block, and the cylinder walls look good with minimal scarring, you can elect to not rebuild or take apart the shortblock.
If you are not rebuilding or taking apart the shortblock, the rest of your build is relatively easy and straightforward. Remove the knock sensors and your oil cooler assembly from the intake manifold side of the shortblock.

Tape the top of your block and use a wire wheel to remove any imperfections and grind down any material that is not iron on your shortblock. If you are ready to move onto this stage, put your oil pans back and shove rags into any open port, such as your oil level sender, oil ports and water pump orifice.

When you receive your cylinder head back from your local machine shop, make sure to check it over and make sure that each cam cup moves smoothly in it’s jacket and that there are no imperfections on the surface of the cylinder head.

If you are installing a new cylinder head gasket and ARP head studs, make sure to follow the torque specs on your paperwork to ensure a positive seal.
That concludes our How To Rebuild Your 2JZGTE article, let us know if you have any questions or comments by leaving them below.
More 2JZ Articles
- How to Wire your 2JZGTE Swap in a 240SX
- How to Test your 2JZGTE Camshaft Position Sensor
- How to Test your 2JZGTE Mass Air Flow Sensor
- How To Wire your 2JZGTE


[…] engine set) Click here for more information on injector sizing, how to install 2JZ injectors and how to build your 2JZ engine. – Emissions If you are swapping in a JDM 2JZ and want to pass smog or the […]
[…] 3 of our How to Swap a 2JZGTE Guide was mostly about How to Rebuild your 2JZGTE engine. And today we’ll be looking at all the 2JZ torque specifications that relate to this work. […]
[…] equipped with all the factory components from Nissan. Also your engine must be used or used and rebuilt in order to comply with the NHTSA. Also all catalytic converters, oxygen sensors, and charcoal […]
Got a VVT I 2jz and noticed u took out cams without removing gears. Is there a way to do that on my motor?
Hey Josh, thanks for reading.
Unfortunately no, your VVTI intake cam gear will need to be removed to get your 2JZ cams out of your head.
Let us know how your project turns out. Check out our Budget 2JZGE swap in a S14 article for more information on how to rebuild a VVTI engine.