

Transmission problems can be a headache. When your automatic transmission has a faulty controller or is low on transmission fluid, it can cause the same kind of symptoms many people mistake as a failing transmission. Keeping your transmission fluid full and the many valves and controllers in tip top condition is crucial to maintaining your transmission’s longevity and performance.
This is when you can use our guide on How to Change your Auto Transmission Fluid to keep your car running in optimum condition.
How do I know my transmission is bad?
Make sure you check the fluids in your transmission, and replace your transmission filter if need be but failing a Check Engine Light (CEL), chances are you will not know your transmission is bad until you take it to a professional.
This section shows you how to change your transmission fluid, and troubleshoot your own transmission before paying a professional big bucks to diagnose your vehicle.

Is my transmission fluid low?
If your transmission relies on the transmission fluid to be clean, viscous and capable of handling the pressures required for your transmission to shift smoothly and reliably. Below are some of the symptoms of a transmission with low fluid levels.
- Hesitation or bucking transmission
- Shifting with a “clunk” into gear
- Slipping transmission
If your transmission fluid is low
With the emergency brake on and the gear shifter in neutral, use a funnel to add fluid to your transmission very slowly at a time until your automatic transmission dipstick is at “Full”
Your transmission dipstick is located near your transmission, and make sure not to confuse this with your engine oil dipstick! Pictured is the transmission fill tube from a 2001 Honda Odyssey.

Today we’ll be showing you how to change the transmission fluid in a 2001 Honda Odyssey (RL1 ) equipeed with a 3.5L V6. To help illustrate how vital your transmission fluid is, we chose this vehicle due to it’s well known transmission problems with the 4 speed automatic transmission it came with. The available four speed transmission in this vehicle has a long track record of serious transmission problems stemming from a bad bearing in the 3rd gearpack that comes apart, scattering metal fragments into the transmission and fluid passages.

We always recommend using Honda Authorized ATF in your Honda Odyssey to ensure proper longevity and durability, we are opting for the Honda ATF DW-1 although there is a new fluid available from Honda their DWZ-1.

Raise your vehicle up and secure it on a flat surface with jackstands to locate your transmission drain plug. Our 2001 Honda Odyssey has it located on the driver side of the vehicle, pictured here. Transmissions should be flushed every 25,000 to 35,000 miles, but if your vehicle has high mileage on fluid that has never been changed, it may be a good idea not to change it as the front transmission seal may leak.
Open your drain plug and drain the transmission fully, make sure to place your drain pan so to minimize transmission fluid spills.
Now is the time to replace your transmission filter if your vehicle is equipped with an external one, this Honda isn’t outside of the spool valve which we will not address in this writeup. Next locate your transmission fill tube or dipstick tube.
This 2001 Honda Odyssey will require some things to be moved, namely the PCV and parts of the intake snorkel to allow for your funnel and to minimize spills.
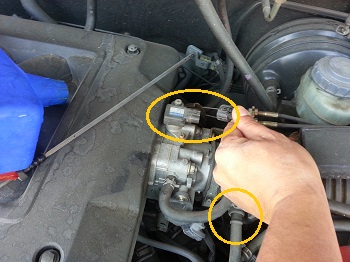
Unplug your Manifold Absolute Pressure sensor ( MAP ) and undo the PCV tube that leads from the engine’s valve cover out of your intake snorkel. Rotate the PCV hardline downwards and out of the way, and then undo the clamp that holds the snorkel to the throttle body. You should be able to slide the intake tube and snorkel out of the way to allow for more space and access to your fill tube.

Slide the vacuum line off the intake snorkel and set it to the side, now you should have a lot more space to get to the fill tube and pour your transmission fluid into the car without spilling.
This transmission takes 3.5 quarts and make sure to fill slowly when you start getting towards the end to ensure that you don’t overfill your transmission.
WIth your tranny filled, lower the vehicle reconnect all the hoses and sensors you unplugged and get ready to test your vehicle. Start the motor and shift the gears with the parking brake on and while pressing on the brake, ensuring that the transmission shifts smoothly into each gear.
Now it’s time to test drive your car! Make sure that your vehicle shifts into all gears, especially overdrive and you are all set to go! You should see improved shifting, responsiveness and your car running much more smoothly!
Happy Driving!
- Pro Street Staff
- www.prostreetonline.com
- 1-888-776-7022


